Showing posts with label DIY. Show all posts

8.24.2011

DIY Art

Remember this lovely frame that I got for $9 at the Cheapo Depot?


It was totally gross unique, but it didn't fit into my house like it was.


After a coat of primer... I noticed that there were some edges that needed a little TLC.


So I used a little Caulk to blend them together.


And finally used an atlas to cut out a male and a female figure! 


What do you think??

Now, I just need to finish getting my other art and pictures in order to hang up my gallery wall.

8.23.2011

99% Off

Meg spotted this Caned Side Table on Joss & Main for the small price of $399.95. I got mine for 99% off that price at a garage sale, for only $3. And then I spruced it up with some paint and fabric.


$400 for a caned side table....really?

7.28.2011

Chunky Frames


I have been on the look out for some chunky, ornate, cheap picture frames for a LONG time... and I never had any luck until now!  I found not one, but 2 picture frames that fit this description.  The first is a small frame I found at HomeGoods for $6.

This AWESOME frame and the (not so) lovely art were only $9 and a place called 'The Cheapo Depot'. I kid you  not - that was the name of the store.  It is in Wisconsin (somewhere) and we stopped there to buy fireworks.  While the hubs was spending hours picking out the perfect type of exploision, I cruised the ailes of the Cheapo Depot and nearly jumped up and down when I found the frame.


Next I took a can of spray primer to them...


The little frame got a coat of high gloss black, and a heart cut out of a map of Colorado.  We took a family vacation there, and I have a bunch of those pictures framed, so this will look great hanging next to them.


Oh - and does the above look familiar? Yep - I finally made some art that I found from Pinterest!!!

The other frame stayed white, and the nice flower vase is no longer.... check back next week to see the final output!

7.07.2011

Wonder Wall

As I gaze at our basement wall, I feel a unexplicable urge to change it. It's currently painted a brown-ish color, along with the other walls. I want to do something different. Some kind of installation. Here are some of my favorite ideas. (p.s. I am sorry in advance for getting this song in your head, but I am currently humming Wonderwall by Oasis).


Reclaimed Wood Wall #1
3-26-reclaimed wood.jpg
Found on Apartment Therapy here


Reclaimed Wood Wall #2
Iroko woodblocks as feature wall  - Reclaimed timber

Found on Victorian Woodworks here


Reclaimed Wood Wall #3

Found on Centennial Woods here


Reclaimed Wood Wall #4
Found on the burgundy circus here


Uber Feminine Paper Flower Wall 
40510ruchewalls2.jpg
Found on Apartment Therapy. Orginally posted by Ruche here.
 
To be honest, I don't think I could really do this one in my home. However, I think it's really pretty and lovely...and if I was a bit more "girly" I would do it!


Paper Mache Book Page Wall
40510ruchewalls3.jpg

Found on Apartment Therapy. Originally posted on Ruche here.

This idea is so smart!
You could pick up lots of books at Goodwill and/or Garage Sales and then just go to town.


Toilet Paper Roll Art

 Found on A Common Thread. Originally posted on Growing Up Creative here.


Modular Wall Treatment

Found on Apartment Therapy re-nest


Square Wallpaper


Found on Land of Nod here


A Rope Wall


Found on IndyStar.com here

I think any one of these ideas is genius and would give our basement that spark that is missing.
Any one of these ideas would also be a lot of work. Which do you guys like best?

7.01.2011

reFind?

Yes - that was supposed to be a question mark - because it seems like we have not reFind anything recently... but I promise I am working on it.  I will have 2 pieces to show you next week.

Oh, and in case you dont believe me - here are some pictures of my garage.

I am working on the above for my mom and dad.  It will be done soon and be making its way up north to our cabin. 


My new painting 'room' that Nate built me.  If you look really closely, you can see Nate in there, putting the finishing touches on a piece of furniture.  Yes- my husband rocks - he loves to hang out and work in the garage with me :)


Nate gets more high tech with his furniture re-dos than I do....


I dont even want to know how many pieces of furniture there are waiting for me in there.... more than I have had time for lately (I have been traveling for work and weddings), but am excited to keep hacking away at the projects.

Am I the only one like this?? Please tell me that someone out there reading this blog has a ton of projects lined up... and is still looking for more?

6.29.2011

The project that will never end....

Sometimes I think that our posts give the impression that Meg and I are constantly working on projects, and that we start and finish projects over the course of a weekend or maybe even a day. I want to be honest with you guys....this is NOT always the case.

For example: do you guys remember this post? You know the one about my stenciling project....the one from April 5th. Several of you had kind encouraging words about that post, even mentioning that you couldn't wait to see the finished project.

Well...you might have to wait awhile, because.....Yep....I am STILL working on that project. It's like the project that will never end. To be honest, I have more or less abandoned the project and have taken a total hiatus from working on it, because I'm tired of it and it takes WAY longer to stencil than I thought. And I got annoyed.

Some of you that have seen the wall in-progress in person and have mentioned that you like the "un-finished" look of it....so many in fact that I have considered leaving it as is. But I think Jeff would kill me if I left it like this....So, here is my commitment, in writing to the blogosphere. I will finished this damn project, before the end of June July. Maybe :)


6.14.2011

Painting Prep

I started this series of posts last Friday with a post about our decision to DIY Paint our home's exterior. We actually finished up the job last weekend (perfect weather!). But before we could get down and dirty with painting, we had to get gritty and gross prepping for the project.

In all honesty, I think the prepping part may have been harder than the painting part. There were three main things that we did to prep the house.

1) Power Wash
2) Scrapping
3) Taping

I don't have any pictures of the spray washing, as my faithful father took on this task, while my hubby and I worked our day jobs. The take away is that he used an electrical power washer to spray down both the house and the garage. He worked from top to bottom, and used just enough pressure to blast off the dirt, but not so much pressure that he blasted off the paint or shakes (our house has cedar shakes).

The Scrapping was a major undertaking. Again, my father started the process while we were at work, and we joined in on the "fun" on Friday afternoon. We used a combination of these things to get the job done.


Wire Brush. 
Pic here.


Paint Scrapper


Pic here.


Another Paint Scrapper 


Pic here.


Good ol' fashioned flat head screwdriver. 


Pic here.

We actually purchased all of the tools at Home Depot (with the exception of the screwdriver, which we already had). So, feel free to visit your local HD for everything you need.

Here is a pic of the front of the house post scrapping. We had to scrap not only the flat surfaces, but also along the bottom of the shakes, where older paint had built-up. It was crucial that we removed both built up paint and peeling paint, as moisture can build up there. Plus, if you don't knock-off that stuff, you risk it chipping off later and messing up your paint job.


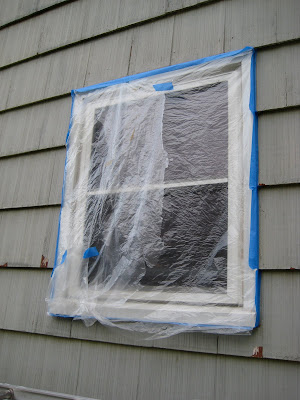
The final prep was taping. We rented an industrial paint sprayer for the big day of painting and we knew that we didn't want paint splattered all over our nice, crisp white windows. So, we taped off each window and door, using plastic drop clothes and painters tape.


Next post....painting! Here is a sneak peek :)


6.10.2011

We Painted!

This is the outside color of our house currently (or somewhat current).


We have finally decided to take the plunge and paint the outside of the house. And we are planning to DIY the project.

The color we landed on isn't a big surprise, as it is similar to lots of the other colors we have chosen on the interior. We think Behr Anonymous is a great choice as it fits into the neighborhood seamlessly. The neighbor to our south has their home painted a nice beige-ish color. Similar to Behr Pebble Shore. The neighbor to our north has their home sided in a nice blue-ish color. Similar to Behr Windy Seas. We think that our choice (Behr Anonymus) will fall between those two colors perfectly. To contrast the Behr Anonymous, we have selected a nice crisp white for the trim, Behr Frost (no need to link....it's white).

Now that we have the colors picked out, we have to figure out how much paint we actually need on hand to complete the project.

Jeff did the math by measuring each side of the house, and subtracting the windows and doorways. Here is where we ended up:

South Side: 288
West Side: 248
North Side: 340
East Side: 182
Garage: 475

We decided to rent a paint sprayer to expedite the painting process. The plus of this, is that it moves along the painting, the minus is that it typically uses more paint. When all was said and done, we bought five extra gallons of paint to get our house/garage painted. Worse things could have happened though.

This DIY project is a massive undertaking (I was kinda thinking to myself "what the eff"), so I am planning on splitting up the project posts. Next up.....The Prep.

5.09.2011

Ceiling Debacle: Part Two - Success!

Last time I posted, we were left with this....


The framework for the ceiling tiles that we pulled down. We had anticipated having a wonderful day of yard work on Sunday, but due to weather, it just wasn't in the cards. So, we tackled another indoor project. Jeff tore down all of the framework, with a hammer and crow-bar and carried out to the garage.

Here is the wonderful pile!


From there we took each and every board and removed the nails. We were sure to get each and every one of them. As Jeff said during the project, a lost nail will eventually be found.....in your tires. :)

Here is our nail pile!


After we had removed all the nails, we cut each board down into manageable size (using our circular saw) and stowed them away....in old beer boxes (classy!). 

Here is Jeff modeling the circular saw.


We did some inspection and from what we can see the wood is untreated, so if we need some kindling in the future for an outdoor bonfire, we should be able to use this boards as starter logs.

So, with all that work done, we are left with a naked ceiling in the storage area. I kinda like the bare wood, but we have also considered painting it a nice fresh white. What do you guys think? Paint it or leave it alone?